

Hp Laserjet 700 Color Mfp M775 Driver Updated
Hp Laserjet 700 Color Mfp M775 Driver
Z7_3054ICK0KGTE30AQO5O3KA30N0
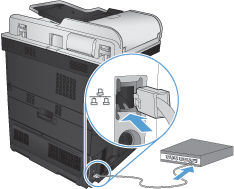
HP LaserJet Enterprise 700 color MFP M775 - Connect the printer to a network by using a network cable and install the software (Mac Os Ten)
Configure the IP address
-
Make sure that the printer is turned on and in the Gear up land.
-
Connect the network cablevision to the printer and to the network.
-
Wait for 60 seconds before continuing. During this fourth dimension, the network recognizes the printer and assigns an IP address or host proper name for the printer.
-
Locate the printer's IP address on the printer control panel.
annotation:
The steps vary depending on the control-panel type.
FutureSmart 3
FutureSmart 4


-
FutureSmart three: On the printer control panel, touch the Network
 push button.
 -
FutureSmart iv: On the printer control panel, touch the Information
 icon, and and then touch the Network push button.
If you lot are unable to locate the printer'due south IP address on the printer control panel, you can print a configuration page. The IP address or host name is listed on the configuration page.
Follow the steps below to impress a configuration page.
note:
The steps vary depending on the control-panel type.
FutureSmart three
-
From the Domicile screen on the printer control console, scroll to and touch the Administration button.
-
Open the following menus:
-
Reports
-
Configuration/Status Pages
-
Configuration Page
-
-
Affect the Impress button to print the configuration page.
note:
If the printer is connected to a network, a Jetdirect folio will too impress.
-
Observe the IP accost on the Jetdirect page.
-
IPv4: If the IP address is 0.0.0.0, or 192.0.0.192, or 169.254.x.x, you must manually configure the IP address. Otherwise, the network configuration was successful.
-
IPv6: If the IP address begins with "fe80:", the printer should exist able to impress. If not, manually configure the IP address.
Figure : Jetdirect page

-
FutureSmart four
-
From the Dwelling house screen on the printer command panel, roll to and select Reports.
-
Select Configuration/Status Pages.
-
Select Configuration Folio.
-
Select Print to print the configuration folio.
note:
If the printer is connected to a network, a Jetdirect page volition also impress.
-
Find the IP address on the Jetdirect page.
-
IPv4: If the IP address is 0.0.0.0, or 192.0.0.192, or 169.254.x.x, yous must manually configure the IP accost. Otherwise, the network configuration was successful.
-
IPv6: If the IP address begins with "fe80:", the printer should be able to impress. If non, manually configure the IP address.
Figure : Jetdirect page
-
-
Install the software
-
Close all programs on the computer.
-
Install the software from the CD.
-
Click the printer icon, and follow the on-screen instructions.
-
Click the Close push button when the installation is complete.
notation:
Complete the following steps after completing the printing-system software installation merely if y'all did not add together a printer when running the installer.
-
At the computer, open the Apple tree
 menu, click the System Preferences card, and and so click the Print & Fax icon or the Impress & Scan icon.
 -
Click the plus symbol (+).
-
Use either Bonjour (default browser) or IP Press for the network connection.
note:
Bonjour is the easiest and best method to use if the printer is installed on your local network.
IP Press must be used if the printer is located outside the Bonjour link-local space on a larger network.
If yous are using Bonjour, complete the following steps:
-
Click the Default Browser tab.
-
Select the printer from the list. The software verifies that the printer is continued to the network. The Print Using field is automatically populated with the right PPD for the printer.
note:
If you are on a network that has more than one printer, print a configuration page and match the Bonjour Printer Name to the proper name on the listing to place the printer that you are installing.
note:
If the printer does not announced in the list, verify that the printer is on and continued to the network, and then endeavour turning the printer off and so on again. If the printer PPD is not in the Print Using drop-down listing, plow the computer off and then on again, and then restart the setup process.
-
Click the Add push to complete the setup process.
If you are using the IP Printing method, complete the following steps:
-
Click the IP Printer tab.
-
Cull HP Jet Straight – Socket from the Protocol drop-downwardly carte. This is the recommended setting for HP printers.
-
Type the IP address into the Accost field on the add printer screen.
-
The Name, Location, and Print Using information are automatically filled in. If the printer PPD is not in the Print Using field, turn the reckoner off and then on once again, then restart the setup process.
-
Hp Laserjet 700 Color Mfp M775 Driver
Posted by: bryanthaparged.blogspot.com
0 Response to "Hp Laserjet 700 Color Mfp M775 Driver Updated"
Post a Comment